This section describes how to manage lab resources needed for designing and running performance tests.
Note:
-
Testing hosts for a particular project can also be viewed in the ALM project itself.
-
ALM Editions: Functional testing host management is available only for ALM Edition.
This task describes how to:
Before you design and run tests, you must add the required resources to ALM. These include the hosts, the host pools to which the hosts belong, the location of the hosts, and MI Listeners for load generators that are located over a firewall. For an overview of lab resources, see Lab Resources Overview.
Before adding testing hosts, ensure the following:
-
Testing tools were installed on your testing hosts.
-
If a testing host you are adding is in a remote location, make sure that the location was added in the Lab Resources > Locations module.
-
If a testing host you are adding is over a firewall, the host must communicate with a Performance host through an MI Listener. Make sure that the MI Listener was added in the Lab Resources > MI Listeners module.
-
Micro Focus ALM Lab Service has been installed on testing hosts you are adding. For task details, see Installing ALM Lab Service.
Tip: You can use the Import Hosts feature to import a list of hosts from an Excel file into ALM. For details, see Import host data from Excel .
-
Create a new resource.
-
In Lab Management, under Lab Resources, select the relevant resource module, and click the New <Resource>
 button. See New Testing Host Dialog Box.
 -
In ALM, under Lab Resources, select the Hosts module, and click the New Host
 button. See New Testing Host Dialog Box. Hosts created in ALM are private hosts and can only exist in one host pool at a time.
-
-
Register the testing host. For security reasons, a testing host must be registered using Micro Focus ALM Lab Service before it can be used. After the testing host has been registered, the testing host registration must be approved from within Lab Management.
To download and install Micro Focus ALM Lab Service, select Help > ALM Tools to open the ALM Tools add-in page, and click the appropriate link. For task details, see Using ALM Lab Service.
Note: Lab Service and the ALM server to which you are connecting must be of the same version in order to be compatible. If your version of Lab Service is not the same as the ALM server, the Hosts/Testing Host grid displays your testing host as Unavailable.
You can import a list of hosts from an Excel file (.xls or .csv) into ALM.
-
Ensure that the Excel file is set up so that the columns can be recognized and mapped by the Import feature.
-
The first row of the Excel file must contain the field names, or corresponding logical names, that appear in the table below. (Logical names are not case sensitive.)
Some fields are mandatory, others are required or optional.
-
Mandatory indicates a field that must appear in the Excel file. If you omit this field, the import fails. If you omit a value in one of the rows of this field's column, the import of that specific row fails.
-
Required indicates a field that should appear in the Excel file. If you omit this field, the code adds the field with the default value for all rows. If you include the field, but omit a value in one of the rows of this column, the code adds the default value for that row.
-
Optional indicates a field does not have to appear in the Excel file. Omitting this field has no effect on the import procedure.
-
-
Fields representing virtual, reference, and invalid fields are ignored.
-
Empty columns are allowed.
-
Operational
-
Non-Operational
-
Unavailable
-
Unix Load Generator
- Windows Host
- Windows Standalone LG
-
"Windows<space><space>Host"
-
"Unix<space><space>Load Generator"
-
1-Lowest Priority
-
2, 3 ... 8
-
9-Highest Priority
-
Y
-
N
Set up the columns and values in the file as follows:
Field name
Logical Name
Value
Field for
HOST_NAME
Mandatory
Name
Any string
The valid name of the host machine.
HOST_PURPOSE
Mandatory
Purpose
Controller, Load Generator, QTP, Sprinter, and so on.
The purpose of the testing host.
Note: This can be any combination of the options. Options should be separated with a semicolon and be without spaces.
Example: Controller; Data Processor; QTP
HOST_STATE
Required
Status
Default: Operational
The host state.
HOST_INSTALLATION
RequiredInstallation
Default: Windows Host
The type of host installation.
Note: There is a double space in:
HOST_PRIORITY
Required
Priority
Default: 5
The priority of the host.
HOST_SSL_ENABLED
Required
Enable SSL
Default: N
SSL-enabled
HOST_USERNAME
Optional
Username
Any string
The user name for logging in to the host.
HOST_PASSWORD
Optional
Password
Any string
The user password for logging in to the host.
HOST_DOMAIN
Optional
Domain
Any string
The host domain.
HOST_DESCRIPTION
Optional
Description
Any string
The host description.
The fields specified in the table below must not be included in the Excel file. During the import of each host, these fields are assigned default values.
Field name
Default value assigned
Belongs to pools
General
Location
Default
MI Listener
None
Note: If data for these fields is included in the Excel file, the data is ignored. Default values that are not relevant for a particular host must be modified manually in the Hosts module.
Example:
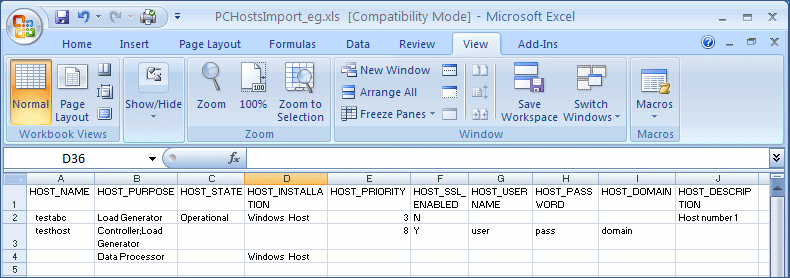
The following image illustrates an Excel file set up with the following AUT hosts: [test]abc, [test]host, and a third host whose name was not provided.

-
-
Import the hosts:
-
Under Lab Resources, select Hosts.
-
In the Hosts module, select Hosts > Import.
-
Browse to the Excel file containing the hosts, and click Open.
At the end of the import process, a report displays the import results, and the imported hosts are listed in the Hosts module. Hosts that are not imported successfully must be added manually.
-
To modify or view a lab resource's details, in the relevant Lab Resources module, right-click the resource in the grid and select <Resource>Details. See Lab Resources Modules User Interface.
Under Lab Resources, select Hosts. Right-click a host in the grid, and select Check Host.
The Task Manager opens, and the overall result of each check performed on the host, Passed or Failed, is displayed.
You can view the progress of the host check in the Hosts module's Check Host Status tab.
Note: The only test which can be run on a Functional host is Ping to Host.
Based on the purpose and location of the host, the following checks are performed on the host:
| Check Performed | Load Generator Host | Controller Host | Data Processor Host | Functional Host | |||
|---|---|---|---|---|---|---|---|
| Regular | UNIX | Standalone | OFW | ||||
| Ping to Host | Yes | Yes | Yes | N/A | Yes | Yes | Yes |
| Installed Patches | Yes | N/A | N/A | N/A | Yes | Yes | N/A |
| Services | Yes | N/A | N/A | N/A | Yes | Yes | N/A |
| Performance | Yes | N/A | N/A | N/A | Yes | Yes | N/A |
| Over Firewall Status | N/A | N/A | N/A | Yes | N/A | N/A | N/A |
Alternatively, you can perform the above checks, together with an additional connectivity check from the host to a particular URL. Right-click a host in the grid, select Check Connectivity to URL, and enter the URL.
Example:
-
Regular URL:
http://www.website.com -
Machine name:
machine22orhttp://machine22
Under Lab Resources, select Hosts. Right-click the host in the grid that you want to reboot, and select Reboot Host.
Notes:
-
To install patches on a host, you first need to have uploaded the patches to ALM. For details, see How to Upload Patches to ALM.
-
Patches can be installed on a host only when the host state is idle.
- You can only install patches on Performance hosts.
Under Lab Resources, select Hosts. Right-click the host in the grid on which to install the patch and select Install Patch.
For user interface details, see Select Patch to Install Dialog Box.
Note: You can only reconfigure Performance hosts.
Reconfiguring a host resets the host license, the Performance Center system user (IUSR_METRO), and the Communication Security passphrase on the host machine.
To reconfigure a host, under Lab Resources, select Hosts. Right-click the host in the grid that you want to reconfigure, and select Reconfigure Host.
To end a process on a Performance host, under Lab Resources, select Hosts. Select a host, and in the Processes tab, select the process and click  .
.
Note: Host pool management is only available in Lab Management. It is not available in ALM.
You can populate host pools with hosts in one of the following ways:
-
Hosts module. You can link a host to one or more host pools.
-
Pools module. You can link one or more hosts to a particular host pool.
To link a host to one or more host pools from the Hosts module:
-
Under Lab Resources, select Hosts.
-
Right-click a host in the grid, and select Host Details.
-
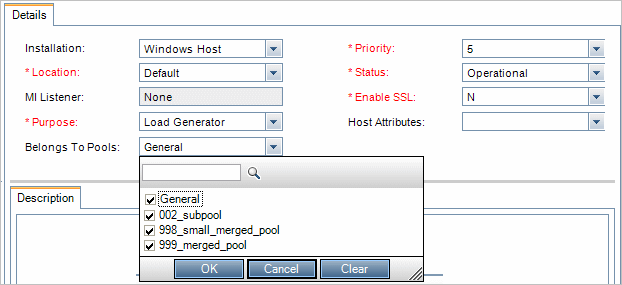
Click the down arrow adjacent to Belongs to Pools, and select pools in which to include the host. Click OK.

To link one or more hosts to a host pool from the Pools module:
-
On the Lab Management sidebar, under Lab Resources, select Host Pools.
-
Select a host pool in the grid.
-
In the Linked Hosts tab, click Add Hosts to Pool
 . Select hosts from the grid and click Add.


